Grit Casserole: The Perfect Southern Side

Everyone is home for the holiday season. Friends and relatives are visiting daily and planning meals for this level of activity can be tedious. Managing the freezer space presents it own set of challenges and I find myself using that coolers on the porch more often. Normally I make up crackers and keep local cheeses and farm fresh eggs around so there can be some interesting conversation  about food and how it’s created.

Old family recipes really play an integral part in our entertainment schedule this time of year. It’s a great way to remember loved ones that have passed or simply can’t get to your house due to the crazy weather.  Granny’s pimento cheese, Grandmom’s leftover meatloaf and turkey sandwiches, Dorothy’s tarts and pecan sandies, Grandpop’s favorite fudge recipe and the crazy Walter family recipe for eggnog. And my dear Grandmother’s refusal to cook anything because she raised 13 children and was “done cookin” as she put it! These foods inspire the best conversations that keep us laughing all the way through our holiday. So keep track of those recipes this year and think about passing them along as a birthday gift or storing them with your ancestral files for others to have in the future.

In the meantime, have a wonderful 2011 and keep discovering new recipes!

Baked Cheddar Grits is one of our favorite “leftover” recipes because they are really pretty simple. I make a bunch of grits when I cook them from scratch because they do take a bit of effort and we all love them. This recipe comes from Fine Cooking Vol 97 and it’s quite adaptable to your own flavor changes.

For the base grits, I use traditional yellow stone ground grits with a mixture of 2 cups water, 2 1/2 cups milk, 1-2 tablespoon butter, 1/2 teaspoon salt, and a pinch or two of pepper. You bring this to a simmer, cover it and stir as it cooks for about 45 min-1 hour. Less time means more corn grit so it’s a personal decision as to how long you want to cook it. Sometimes I finish the base with a tiny bit of cream at the very end, if I have it.  I normally cook with 1% milk which can be a bit thin in taste and the cream adds just a bit of sweetness without all of the calories. As a base, you can do a lot of things with this over the holiday for every meal and this little casserole is great for any time.


Grit casserole with cheese, roasted peppers & garlic

Ingredients:

  • 1 batch of grits as described above
  • 1 additional tablespoons butter
  • 1 1/4 cups grated aged white Irish cheddar cheese
  • 1 tablespoon flour
  • 1/2 – 1 teaspoon fresh chopped thyme
  • 1 teaspoon minced roasted garlic mashed into a paste
  • 3 large eggs, separated
  • 1/4 cup heavy whipping cream

Directions:

  • After you have cooked the grits and they are warm. Cover and set them aside.
  • Mix the grated cheese, flour, thyme, minced garlic and several grinds of pepper to the hot grits and taste to adjust the seasoning (before you add your raw egg).
  • In a small bowl, mix the egg yolks with the cream and add this to the grit mixture, blending well.
  • In a clean bowl, beat the egg white until they are stiff and fold these into the grits 1/3 at a time making sure not to deflate the egg whites.
  • Scrape the entire mixture into a 8x8x2 glass dish and bake at 350F until puffed and lightly browned. This should take about 50-60 minutes. Serve warm.

Optional: You can also add bits of cooked bacon, ham, roasted peppers or green onions to this, but keep the pieces small so the mixture is able to rise with the egg whites. I have also used “toasted” grits but I am not fond of the popcorn flavor and additional grit texture for this recipe.  You can substitute cornstarch for the flour in this recipe. Remember that cornstarch has double the holding power of flour so cut back a bit. You can make a half batch of this recipe just as well (which is what you see in the photo).


Posted in General, Nut-Free, Recipes, Vegetarian, Year-Round | Tagged , , , , , , , , , , , , , , , , , , , , , , , , , , , , | Leave a comment

Swedish Meatballs & Bolognese Ragu From Your Freezer

I love meatballs! Chicken, beef, lamb. Not for the obvious reason of enjoying local fresh “clean” meat, but because you can make them up in big batches relatively quickly and freeze them for later use. And now all of our local farms have plenty of meat available from their late fall processing.

My meatballs are small for a couple of reasons. First, they bake up quicker and they are more healthy than frying. Second, they freeze well and thaw fast when you’re in a pinch for time. Third, they are versatile. You can break them up into lasagna, soup or on top of your pizza. or send them with your kids to college. You can leave them whole for a sub sandwich or put them on a variety of pastas with different sauces. The meatballs store for up to 3 months in the freezer so you have plenty of time to use them all up.

When I am making the meatballs I run a test by cooking up a couple to check the salt, pepper and spice levels in the meat.  This is also an opportunity to divide up your meatballs and adjust some with more spices and some with less if you have particular needs within your family. I cook up  the test meatballs in a small frying pan and adjust the raw meat accordingly. It takes just a couple of minutes and allows me double-check the recipe flavors.

Swedish Meatballs are relatively inexpensive and have an interesting mix of flavors. In more recent years, I started to use these meatballs, broken up,  for a Bolognese Ragu with Fettuccine recipe from Cooking Light that I ran across several years ago. The ratio of meats in the meatballs is almost the same as the original recipe and using the meatballs and frozen stock items cuts the production time for dinner in half.

Ingredients:

  • 1 lb ground turkey
  • 1/2 lb ground pork
  • 1/2 lb ground beef
  • 1 cup minced sweet onion
  • 1/4 teaspoon ground allspice
  • 1/3 cup soft bread crumbs (any kind)
  • 1 beaten egg
  • 1 teaspoon Worcestershire Sauce
  • 1/2 teaspoon salt
  • 1/4 teaspoon pepper

Directions:

  • Mix the bread crumbs, onion, spices, egg and Worcestershire sauce together until well blended.
  • Then mix all three “meats” together with the first set of ingredients and roll into 1″ meatballs. Set these on a baking rack which is set onto a baking pan with parchment paper to catch the grease in the bottom of the pan.
  • Bake at 425F for about 10-15 minutes. You want them cooked through, but not browned or they will come out dry later when served.

Traditional White Sauce:

For the traditional but lighter and much quicker version of a “white” sauce for these I blend together about 12 ounces of cold beef broth with 1 tablespoon cornstarch until the cornstarch is completely blended. Then I blend in about 1/2 cup of evaporated milk (whole milk or half & half will work but adjust the amount you are using because evaporated milk has less water in it) and bring the entire mixture up to a low simmer to set the cornstarch in action. After that cooks for a couple of minutes and begins to thicken you can add the already heated meatballs and serve over pasta with a bit of fresh parsley sprinkled on the top. You can also add a bit of Asiago or Parmesan cheese for some additional flavor

Traditional Bolognese Ragu Sauce:

I’ve adapted this sauce to fit a busy lifestyle by storing an equal mix of sauteed carrots, celery and onion in my freezer. You’ll need a total of about 3 cups (1 cup of each ingredient). Traditionally there would be less carrot, so if you want or need to cut back on an ingredient, you can reduce the carrot to 1/2 cup.

You are going to saute all of the veggies until they are soft. Then you’ll add your broken up meatballs and cook everything until it’s a little bit brown to develop some flavor.

Once it’s a bit brown, add 1 cup of dry white wine to deglaze the pot, 1 bay leaf, 1/4 teaspoon of ground nutmeg, salt and pepper and bring this to a boil. Cook 5 minutes and add about 10 ounces of tomato puree and about 14 ounces of chicken broth. Again, I have roasted tomatoes and chicken broth stored in my freezer so I use those and it cuts out at least half of the cooking time because the flavor is already built into my base ingredients. You will need to cook all of this for about an hour if you don’t have something already home-made to use because you’ll need to concentrate your flavors by reduce the water your tomato and chicken broth a bit in the cooking process.

Once you’ve cooked this for about an hour, stir in 1 cup of milk. I do temper my milk or heat it ahead of time. Gently cook this for another 30 minutes.

Serve over fettuccine and top with Parmesan cheese and fresh parsley.

Posted in Beef, General, Nut-Free, Pork, Recipes, Year-Round | Tagged , , , , , , , , , , , , , , , , , , , , , , , , , , , , | Leave a comment

Creamy Leek & New Potato Soup

This is one of those rare soups that you can serve chilled in the summer to relieve the heat or warm in the winter to fill your tummy with delightful goodness. If you make this during the summer, you might consider reducing the amount of potatoes a bit so the soup is thinner or adding a bit more stock. We prefer it a bit thicker in the winter and I have adjusted the original recipe from Chef Jacques Haeringer (who apparently learned to make it from his father; who learned to make it from Chef Lucien Diat in Paris). So there’s your history lesson.

Of course, shortcuts make any recipe like this the most useful. Most of the recipes from Chef Haeringer start with a solid stock base that just takes too much time for most cooks so pick a good brand and keep it on hand. Potatoes and onions are a couple of those things that most of us keep in the pantry so you are on your way to making this soup. I was able to get most of my ingredients locally except for the parsley since it’s out of season. Several farms around the Piedmont are using double and single hoop houses to continue to produce great food and the potatoes picked in the early fall store well into the winter.

I tend to use my stock ingredients from the freezer and pantry to build the flavor as fast as possible. In this recipe I’ve changed out and reduced some ingredients to make this more healthy without eliminating flavor. The frozen onions are sauteed in olive oil instead of butter and my stock is made using a pressure cooker to cut the cooking time to less than half and then frozen. Cutting things like potatoes smaller helps them to cook a few minutes faster. All of these small changes can add up to a half and hour of reduced cooking time without increasing the prep time.

I’ve also tried different potatoes over the years in this recipe. Originally the recipe called for those big high starch baking potatoes. I think the large potatoes don’t add as much flavor as some of the heirloom or local potatoes that we are able to get in North Carolina. Small red new potatoes don’t seem to have enough starch for the soup and don’t puree kind of mealy. The medium starch potatoes like Yukon or something local that is similar in a buttery flavor and a yellow color work really well and give the soup a beautiful color when it’s finished. That said, use what you can find that is the freshest and has been stored properly to maintain the flavor. A rubbery potato is just not going to produce a good soup.

Ingredients:

  • 1 tablespoon butter + 1 tablespoon olive oil
  • 1 cup chopped sweet onion (or 1/2 cup frozen caramelized onions)
  • 1 cup washed, finely chopped leeks
  • 1 tablespoon flour
  • 4 cups chicken stock
  • 4 cups new yellow potatoes (medium starch), peeled & chopped to 1/2″ pieces
  • 1-3 teaspoons salt (please adjust for your stock)
  • 1/4-1/2 teaspoon pepper
  • 1 cup heavy cream (1/2 & 1/2 will work as well, cream is a bit sweeter)
  • 1 tablespoon finely chopped fresh chives (can sub. tops of green onions but don’t use dried chives)
  • 1 tablespoon finely chopped fresh flat-leaf parsley (do not use dried)
  • 1/4 teaspoon Worcestershire sauce (can be eliminated)
  • Optional – pinch of cayenne pepper or dash hot sauce

Directions:

  • Melt the butter and olive oil in a large dutch oven over low heat and add the onion and the leeks to cook until translucent (about 10-13 minutes) but do not brown. If you are using frozen onions just wait to add them until your leeks are finished. (I have not tested freezing pre-cooked leeks yet). Stir often to avoid browning or burning. I normally cover them to sweat them and retain some of the moisture.
  • Add the flour to the leeks and onions and stir in well.
  • Add the chicken stock and bring to a full boil before adding the potatoes, salt & pepper. Cutting the potatoes smaller helps reduce the cooking time. Cook about 10-15 minutes until the potatoes are tender.
  • Puree the soup in a food processor or blender. If you want it superfine, then push through a strainer after you process it. I normally skip the strainer.
  • If you plan to serve this cold than chill the soup at this point and whisk in the cream , chives, parsley and green onion tops right before serving. If you plan to serve this warm then you can slowly add the cream and warm the soup. It’s also possible to warm the cream for a minute in the microwave and then add it to hot soup. The fat content of the cream will help keep it from curdling. If you plan to add a thinner milk then watch the temperature or bring the milk up to the soup’s temperature before adding it. With thinner milks you might consider doubling your flour in the recipe to help thicken it more since the water content of the milk will be higher.

Comments:

I have not tried substituting corn starch in this recipe for gluten-free but I think maybe arrow-root or rice starch would work better for the flavor mix with potatoes. I have not tried substituting a non-dairy milk or evaporated in this recipe yet. I have also not tried to freeze the base of this recipe yet so I’m not sure how the potato puree in stock will react. When I do, I’ll make some new notes on this page.

Posted in Fall, General, Nut-Free, Recipes, Soup, Spring, Summer, Vegetarian | Tagged , , , , , , , , , , , , , , , , , , , , , , , | Leave a comment

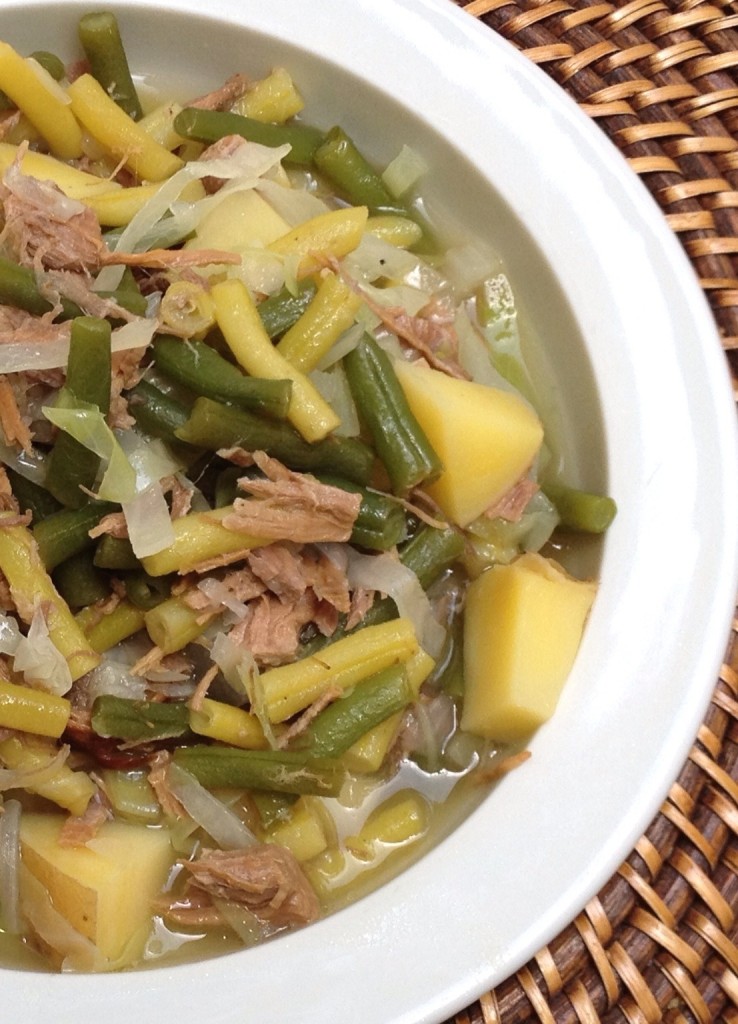
Ham, Potato, Green Bean & Cabbage Soup

Well it’s been snowing since early this morning. A rare sight in Raleigh. We’ve been out several times taking photos and chasing after the dogs.

We had a lovely local, uncured, sustainable ham roast yesterday. There’s a mouthful.  The leftovers present a huge choice. You can make any number of wonderful winter soups, sandwiches, or bbq. I’ve even made an Asian wonton from my ham with fresh local cabbage.

Today, I’ve chosen to make a very old ham soup recipe that you can make with fresh ingredients or leftovers. There are a few shortcuts along the way if you want to prepare this a bit faster. It requires you to have a few things stocked in the freezer and you can make a half batch just as well as a full batch of this recipe if you family is smaller or you don’t want a second meal out of it. This is a very forgiving recipe it’s fine if you don’t have exact amounts of any given ingredient, just follow the techniques/directions and it will turn out well. As you can see from the photos, I didn’t have fresh local green beans I just skipped them today. But they add a lovely dark green color to balance the light green cabbage when you are serving this to guests.

It doesn’t freeze well after it’s assembled but it keeps in the fridge for a couple of days very well if you don’t mind leftovers or you want to make it in advance. It’s the most beautiful when you serve it up right away. Some of the color is lost as it is stored, but the flavor of the broth increases so there’s a trade off. I have not tried this with a meat substitute yet. I think it might work well with the Gimme Lean spicy (soy) sausage because the flavors would work well together. Let me know how it turns out if you try it so others can too.


Ham & Potato Soup with Fresh Green Beans & Cabbage

Ingredients:

  • 1 tablespoon olive oil
  • 1 teaspoon butter
  • 1 lb ham steak or left over ham roast cut into 1/4-1/2″ pieces
  • 1 cup chopped sweet onion
  • 3 cups cleaned and cut raw green  beans
  • 4-6 cups filtered water
  • 2  lbs new potatoes (yellow or red variety), washed and cut into 1/2″ cubes
  • 1/2 -1 small head of regular cabbage or Napa style cabbage, washed, cut into 1/2″ strips
  • optional – 1 1/2 lbs fresh green (snap) beans, washed, snapped & cut into 2″ pieces
  • optional – 2 tablespoons fresh chopped mint
  • Salt and pepper to taste

Directions:

  • If you are using  a ham steak, start the process with that. If you are using leftover roast, start the process with the onions.  A heavy stainless pot works equally well in this process. I’ve cooked this on a camp stove with heavy professional grade stainless without any difficultly. Raw, uncured spring sweet onions work really well because they have more liquid in them than the store bought or later season onions.
  • Melt the butter and olive oil in a large dutch oven over medium heat and add either the ham steak pieces OR the raw onions to brown them.  Be patient and don’t  burn either in the process. The slow browning is what will add flavor. Caramelizing the outside it is perfect. You will need to add your onions about halfway through the process (or the ham if it’s a pre-cooked roast), watching the heat of the pan. The sugar from the raw sweet onions will help the process as you cook the onions.
  • If you are using leftover ham and frozen caramelized onions, this process will happen much quicker than starting from scratch and a little higher heat often works better to caramelize the ham. Sometimes I use onions that are already caramelized and frozen. The process happens much quicker when you use that method and I just add those when the ham is ready and proceed to the next step. You can also rehydrate onion slices and use them in this recipe if you are camping. If you happen to have some white wine around and you are inclined to use it, you can deglaze the pot when you finish this step with about 1-2 tablespoons of wine, but it’s not a requirement for a great result and it only requires a bit of wine or broth.
  • As soon as you are finished with the ham and onions add 4-6 cups of water to the pot.  Add about 3-4 cups of water if you wanted a thicker soup/stew. Add more if you prefer a bit of broth. I think the broth is very filling and flavorful in this recipe so I opt for more water when I make it. If you have the ability to heat this before hand, that is great so the pot doesn’t cool down during the process, but it will work fine with cold water, which is what we use at the farmers’ market demos.
  • Add in your potato pieces, green beans, salt & pepper, cover the pot, and bring to a boil before reducing to medium heat. The goal in this step to to cook the potatoes and green beans most of the way and this will take about 15-25 minutes depending on the type of pot and the amount of liquid you decide to add. (The green beans are a modification to this recipe that we particularly enjoy during the early summer growing season. If you don’t have fresh, then I would suggest you skip them. Frozen don’t work as well and the canned type tend to fall apart to much and not add the same flavor because they are packed in sugar and salt)
  • Slice or (large) chop your cabbage so that it will easily fit on the spoon with the other ingredients. Add that to the top of the boiling potatoes and ham and put the lid back on the pot. It’s not necessary to stir at this point because the cabbage will steam as the potatoes are finishing. Napa cabbage is particularly fast in this process, taking about 5 minutes. Regular green cabbage can take up to 10 minutes so adjust your potato cooking time accordingly.
  • Stir at the very end to make sure your cabbage if finished and adjust any final seasonings or cooking time before serving.

Notes

June 2011: Made this using both green and purple cabbage and it is much more colorful! Added a new picture which doesn’t give it justice.

June 2012: Made this with 2 colors of green beans and shredded the cabbage. Caramelized the onions first and then added the ham roast and other ingredients. I pre-baked a mess of potatoes the night before for several recipes including the famers’ market demo.  Took less time to prepare the final dish, the potatoes held together better and the color was more beautiful.

August 2012: Yesterday I used about 1 lb of baby bok choy (you need the smaller more tender stalks for this to work) and about a half dozen sweet potato green leaves from Four Leaf Farm (Durham Farmers Market) sliced very thin along with about 1/2 lb of bacon to change the recipe up a little bit.

I cut the bacon into small 1″ squares and just fried that up in a Le Creuset Dutch oven until it was browned. Then I used paper towels to sponge out most of the grease. Added bite size Corolla (like a baby Yukon yellow potato) pieces of potato with the skins on (they are thin skinned) and browned those a bit with the lid on. Next I added the tender slices of bok choy stalks to brown those quickly. That took no more than 3-4 minutes. No need to add any more fat.

Then I added roasted onions left over from another recipe (these can be frozen ahead of time as well) along with some liquid from cooking the green beans the other day and covered this to cook about 10 minutes. Next, I added some leftover green beans and the thinly sliced sweet potato leaves & bok choy leaves and just warmed it for about 5 minutes.

All of this took about 1/2 hour using leftovers and the flavor was quite a bit different and wonderful using the bacon as a replacement for the ham. Much more salty, so be careful about adding salt during the process if you try this adaptation.


Posted in Fall, General, Gluten-Free, Nut-Free, Pork, Recipes, Winter | Tagged , , , , , , , , , , , , , , , , , , , , , , | 5 Comments

Cafe Paninis with Dehydrated Fruit & Homemade Mustard

Panini with dried local pears, fresh local greens, and leftover ham roast

Here we are in winter and the soup is overflowing at our house along with beautiful local salad greens. But that never seems to satisfy the appetites around here so I fall back on grilled sandwiches using leftovers from ham and beef roasts. I’ve been able to make them more healthy over the years doing the normal elimination of  fat thing. But increasing flavor and nutrients can sometimes be tricky when you are satisfying the growing appetites and changing tastes of children along the way.

One of the easiest ways to increase your fruits and vegetables is to change out the mayo on a cold sandwich for mustard, fruit or a fruit butter (made with juices).  The beautiful salad greens that thrive in the fall and early winter are great to add to your sandwich too. I use a heavy cast iron pan to make my grilled sandwiches. Even toast in the morning seems to taste better cooked in this pan. I also have a flat bottom cast iron pan and that works equally well with a foil covered brick on top.

I love pears and apples with ham or cheese sandwiches but the fruit can be difficult to keep once it’s ripe and many fall fruits actually come in during the late summer here in the South.  So I dehydrate them to eat all through the winter months. If you are working with beef, then you can pull out some of the grilled caramelized onions that I know you stored in your freezer in the spring and put those on your sandwich with a slice of local cheese and some homemade mustard. Are you hungry yet? The addition of a poached egg on any open face sandwich ham sandwich makes a great meal with a bowl of warm soup or a side of rice and beans.

Back in September, when the local organic apples and pears were in full swing, I gathered up a bunch, sliced them thinly, and put them in the dehydrator. They didn’t take long to go from juicy mess to dehydrated with a good chewy texture. If you dry them just to the chewy stage, you will need to refrigerate or freeze them because they won’t keep as long in the cabinet. For longer term storage in the cabinet, you need to take them to the crisp/dry stage. The very dry fruit is great to add to soups or re-hydrate for cobblers.

But for sandwiches, the chewy texture is fabulous. The fruit seems to steam back to life just enough using the moisture from the bread as you toast the sandwich in the pan.  Your sandwich will have all the flavor without all the mess of slicing fresh fruit and figuring out what to do with the extra!

If you are really in the mood for something extra special without a lot of cost and a great fun gift you can also make your own gourmet mustard. Elizabeth at Wild Onion Farm in Johnston County, NC sent out an email this week with a recipe for home-made mustard so I’ve decided to include that for you as well, just for fun. Please let me know how it turns out! I’ve just started a batch myself.

Elizabeth has a lovely sense of humor so I’ve left her comments intact. She has been obsessing on this mustard recipe for a while and according to her,  “you won’t taste the subtleties of nicer varieties of wine through the blaze of mustard so don’t bother spending money on expensive stuff, just buy the swill”(as she refers to it).  She remarks that “you can play around with different types of alcohol and vinegar but for a traditional grainy Dijon mustard, use dry white wine, rice vinegar, a touch of garlic and honey, & a dash of allspice”. Here’s her recipe.

Ingredients:

  • 1/2 cup beer, wine, or other liquor (drink the rest for encouragement)
  • 1/4 cup vinegar
  • 1/2 cup yellow mustard seeds (brown mustard seeds are too bitter)
  • 1 tablespoon finely chopped onion/garlic/shallots or other aromatics
  • 1 tablespoon chopped fresh herbs or spices (optional)
  • 1 tablespoon sweetener (sugar/honey/maple syrup, etc)

Directions:

  • Put everything together in a bowl.  Make sure the mustard seeds are submerged in liquid.  Cover tightly and refrigerate for 5-7 days.  Yes, days, don’t rush it, just forget about it til next week.
  • Dump everything into a food processor or blender after the week has gone by and run the machine on high speed for 5 minutes.  If it isn’t as smooth as you want it, continue running for up to another 5 minutes.
  • This should keep indefinitely in a jar in the fridge, or you can  water-bath can in 1/2-pt jars for 10 minutes for a shelf-stable product.  This makes about 1 pint (2 cups).

According to Elizabeth, “homemade mustard is always going to be spicier than store-bought versions.  You can stir in more sweetener at this point to temper the heat, or even more for something closer to honey-mustard”. I’m sure Elizabeth left hers spicy!

Posted in Dehydrating, General, Nut-Free, Recipes, Vegetarian, Year-Round | Tagged , , , , , , , , , , , , , , , , , , , , , , , , , , , , , | Leave a comment

Pumpkin Bread Pudding for Breakfast

This is one of my favorite baked items to bring to the early fall markets to share with other vendors and customers as the weather changes.

After looking at both Smitten Kitchen and Gourmet Magazine I made a few adaptations to my Panettone Bread Pudding recipe; altering the sugar and eggs and eliminating liquor from the recipe so anyone could eat it. There’s no reason this shouldn’t work with a gluten-free bread too. I’ve tested this with almond milk but not evaporated or coconut.

Normally I prepare the pumpkin mixture the night before and keep it refrigerated.  The butter can sit out overnight if it’s not hot in the house. Assembling the recipe and baking it as I’m getting ready for the market is pretty simple since the measuring is all finished. It’s warm when I arrive and perfect with a cup of tea.

You can add also a cup or so of salted/buttered pecans on the top of this in the morning just before you bake it to create a more interesting crunch on the top and add a bit more protein. I really like the contrast of the salty pecans to the sweet pudding. They are easy to make: just toss 1 cup of pecan halves with 1 tablespoons melted butter and 1/4-1/2 teaspoon salt depending on your taste. Then bake at 300 until golden brown or heat a non-stick skillet and toss around on medium heat until toasted but not burned.

More often than not, I use leftover bread from the freezer and roasted pumpkin and beaten eggs that are stored in the freezer. A note on eggs: you can beat them and freeze them for a couple of months. Fresh eggs will easily keep 4 weeks in the fridge but if you buy in bulk and you want to put some in the freezer for winter baking projects they will last a couple of months.

One last note is that I find the clear glass baking dishes consistently work well for this recipe. If I’m taking this dish to a party and plan to leave it, I just use a disposable aluminum pan and keep an eye on the baking time so I don’t over bake.

Ingredients:

  • 1 1/2 cups 2% milk
  • 2/3 cup cooked pumpkin (fresh roasted, frozen or canned)
  • 1/4 cup date sugar (break it up or run it over a fine grater for even consistency)
  • 1/4 cup turbinado sugar
  • 3 large eggs
  • 1/2 teaspoon salt
  • 1 teaspoon ground cinnamon
  • 1/4 teaspoon ground ginger
  • 1/8 teaspoon nutmeg
  • 1/8 teaspoon ground allspice
  • 1/ teaspoon of ground cloves
  • 5 cups cubed (1″) day old white bread
  • 6 tablespoons unsalted butter
  • 8″ square glass baking dish or deep dish glass pie pan

Directions:

  • Add the butter to your baking dish as you preheat the oven to 350F with the rack in the second lower position.
  • When the butter in the dish has melted, pull it out and add your bread crumbs, tossing to coat them well. Make sure to coat the sides and the bottom of the baking dish with the butter really well. It makes a difference when you go to clean the pan later.
  • In a mixing bowl whisk together the eggs and sugar until the sugar is mostly dissolved. The date sugar is a bit stubborn to work with and you need to make sure it’s not clumped together before you start the process.
  • Add your pumpkin and spices and mix together well.
  • Add the milk last and mix until well blended. Refrigerate this mixture if you are not baking right away.
  • Spread the bread crumbs evenly through the pan and gently pour the pumpkin mixture over the bread. I normally let this sit 15 minutes so the eggs come to room temperature and the bread can absorb some of the wet pumpkin mixture.
  • Bake about 30 minutes until the pumpkin custard is set. It really never browns and it’s easy to  over cook, so just keep an eye on it. It will come out moist, but a toothpick inserted will come out clean like a cake.
  • This comes out fairly dense and it will easily serve 8 people.
Posted in Breakfast, Fall, General, Nut-Free, Recipes, Vegetarian | Tagged , , , , , , , , , , , , , , , , , , , , , , , , | Leave a comment

Second Harvest Onion Soup with Venison Sausage

The base recipe for this soup dates back to 1953 and it’s from Jacques E. Haeringer.  Most of his recipes are incredibly simple and I’ve adapted the original recipe significantly over the years so that I can throw it together in about 15 minutes and it’s great for cooking on a camping trip with some changes in the product line-up. I’ve exchanged most of the butter for olive oil and I prefer Asiago to the traditional Parmesan because it’s available locally and in my opinion, it’s a better melting cheese.

The hurdles to making onion soup are mostly time related. Onion soups use caramelized onions and they take about an hour to sweat down. Then you have to make the roux and then you will need some good beef stock to add to the soup as well croutons or bread, and cheese. None of the steps are difficult, but they can be time-consuming. No wonder so many people order this when dining out!

Over the years I’ve developed a few short cuts in the cooking process; a kind of second harvest way of cooking. I caramelize and dehydrate many pounds of southern sweet onions during the spring when they first come in season. I put the caramelized onions in small freezer containers that work for most of my recipes. I put the dehydrated onions in a glass jar with a good fresh rubber seal in a dark pantry so they will retain their color and flavor for the whole year.

The beef broth in my freezer comes from cooking up beef roasts throughout the year along with meaty soup bones from a local farmer.  I always de-fat any leftover broth/drippings from cooking up a roast and then freeze it to add to soup stock. Soup stock is not difficult if you approach it in the same manner as the onions. Get some meat bones from your local farmer and make your stock in a large enough quantity to freeze for several recipes. You really only need to do this a couple of times a year. If you are really in a pinch or you want to make this on a camping trip; I prefer the “More Than Gourmet” brand of stock and keep the 1.5oz packages on hand for emergencies or trips. These are shelf stable and make up 4 cups of stock. You’ll be able to skip the roux if you use this product because it has gelatin in it already. You can use totally dehydrated onions if you are going camping although the cooking time and finished product will differ slightly. I would also add dry spices like thyme, rosemary, oregano and change the croutons out for barley because it’s easier to carry. With the addition of a beef, buffalo or venison jerky, you have a complete meal for camping.

Roux takes just a few minutes to make fresh. If you need a gluten-free roux you just need to do equal parts of butter to rice flour. Croutons are simple to make from leftover bread that you have stored in your freezer. Or, if you prefer, you can use a store-bought variety or something from your local bread maker. We have a couple of excellent bread bakers in our area so I regularly change-up what I use in this recipe.

I decided to try some of the venison sausage that I had on hand and the spices made an excellent addition to the soup.  If you like balsamic or port vinegar, you might enjoy just a touch of that added to the soup right before you top it with the cheese and croutons. And I love this soup with some locally made spanakopita. The spinach, cheese and phyllo just seem to be a perfect blend of flavors.

This will make 2 very generous servings for a meal or 4 healthy servings for an appetizer.


Onion Soup with Venison Sausage & Spanakopita

Ingredients:

  • 3/4 cup of caramelized onions
  • 1/4 cup dehydrated sliced onions
  • 4 cups beef broth/stock
  • 1 tablespoon butter
  • 1 tablespoon all-purpose flour or rice flour
  • 1 1/2 cups toasted croutons
  • 2 tablespoons each of grated Gruyere & Asiago cheese
  • Optional: tad of good aged balsamic or port vinegar at the end before serving

Directions:

  • To make the roux, melt the 1 tablespoon butter in a heavy dutch oven pot and add your flour of choice. Cook over a medium heat stirring constantly to avoid burning the mixture.
  • After about 5 minutes you should have a lovely light brown color and a crumbly texture. Add in your stock and using a gravy whisk make sure to blend the roux and bring to a full boil.
  • As the stock thickens add in the caramelized onions and the dehydrated onions. Simmer for about 5 minutes to rehydrate the onions and then taste for salt and pepper.
  • If you want to add some pre-cooked meat, you should add about a cup’s worth when you add in the onions. That will give it time to warm up sufficiently.
  • Get out your toasted bread croutons and warm them up as the onions are cooking.
  • Serve by placing your soup in a bowl, then add the cheese and then the warm croutons.
Posted in General, Nut-Free, Recipes, Soup, Year-Round | Tagged , , , , , , , , , , , , , , , , , , , , , , , , , , , , | Leave a comment

Seasonal Spinach Balls

Everyone has a list of appetizers that they can throw together pretty quickly for a party and these little spinach balls are no exception. I’ve changed a recipe that was given to me a couple of years back to make it more healthy and use local products. These were eaten up pretty quickly at the Holiday Open House at Seaboard Station. They are kind of ugly and there’s no way around the appearance. But what they lack in beauty they make up for in ease of preparation and range of serving temperatures. This recipe makes about 30 little balls which is plenty for a small group if you have other appetizers.

A couple of “second harvest” notes for you: I always buy extra fresh spinach at the market in the spring and fall to steam and freeze in 6-8oz freezer baggies because farmers normally plant more than they can sell of this crop so the price comes down at some point. The steamed spinach is an easy addition to lasagna, casseroles, quiche, or strata. When I buy fresh local bread at the market it frequently goes a bit stale faster than I can use it because there aren’t preservatives so I cube it or “crumb” it and freeze part of it plain on the second or third day for bread puddings or to as an additive to recipes. Part of it I toast up with herbs and a bit of olive oil for salad or soup croutons. If you have some of the latter in the freezer this will work fine in the recipe. Normally you will already have enough oil in the croutons and there should be enough moisture from steaming the spinach to keep the bread sufficiently moist during the baking process.

In the photo the spinach balls are in the upper left corner on the tall plate with toothpicks in them. I’ll get a closer picture and replace this one in the next couple of weeks.


Spinach Balls at The Shops of Seaboard Station Holiday Open House

Ingredients:

  • 6 oz fresh spinach, steamed  & chopped
  • 2 eggs, lightly beaten
  • 1 roasted garlic clove, mashed
  • 1/2 cup aged Asiago cheese, grated (sub. Parmesan)
  • 1 tablespoon olive oil
  • 1/8 cup pine nuts, toasted & chopped
  • 1 tablespoon minced shallots
  • 1 cup organic stuffing mix (sub. home-made or Pepperidge Farms)
  • 1/4 teaspoon pepper & 1/2 teaspoon salt

Directions:

  • Check the bread stuffing pieces to make sure they are not larger than 1/4″ square. I prefer to make mine smaller and more uniform using the food processor or using a plastic bag and mallet, smashing it up a bit more to keep the texture of the finished product more uniform in texture.
  • Mix together all of the ingredients in a large bowl. Because there isn’t much oil or butter in this updated recipe, you don’t need to chill the ingredients before you form the balls, but I do like to let it rest for about 15 minutes so the water from the spinach and the eggs can permeate and soften the bread crumbs before I bake them.
  • Form small bite size balls. Larger balls will take longer to cook all the way through so I really prefer a small bite which is about 3/4″ diameter. You could freeze or refrigerate the balls at this point and use the later.
  • Set the balls on a parchment paper lined baking pan pretty close together but not touching. These do not expand while cooking. Bake at 300F for 20-30 minutes until they are golden and just starting to brown a bit. You can cook these in a toaster oven but I normally set the heat to 325F in a toaster oven because it lacks the insulation and regulation of temperature is less precise.
  • The beauty of these is that during the summer months they taste wonderful chilled. During spring and fall they are just fine at room temperature and in the winter they are delicious just out of the oven with a bowl of roasted tomato or French onion soup.
Posted in Fall, General, Recipes, Spring, Summer, Vegetarian | Tagged , , , , , , , , , , , , , , , , , , , , , | Leave a comment

Baby It’s Cold Outside Black Bean Soup with Venison Sausage!

Years ago I had a fabulous bowl of black bean soup at the National Storytelling Festival in Jonesborough, TN. If you’ve never been, it’s a wonderful experience to see an entire town join in to make this festival seem like a home-coming for visitors. It’s always the first weekend in October so the colorful leaves and the crisp weather are beautiful in the mountains.

The guys that made it came out of Kingsport, TN and they didn’t really have a recipe that would scale down so they just told me what they put into it and it took a few tests to get to a recipe that I think works well. You can make this a vegetarian dish by eliminating the meat and changing out the broth. I’ve made it with chicken and beef broth. Honestly, I like it both ways and it just depends on what’s in the freezer as to how it gets cooked up during the winter months. It freezes well too.

This year a young neighbor offered me a large piece of spicy venison sausage from one of his hunting trips and I decided to add this to the soup instead of the traditional ham. It was wonderful and if you have the opportunity to do this I would encourage you to try it. I have also used leftover chicken and apple sausage that I caramelized in an aged balsamic vinegar.

I served this soup at Shops of Seaboard Station during the Holiday Open House so those of you that visited me at Galatea may have tasted it with rice. Again, this one can be served with or without rice. Adjust the spices and hot peppers according to the meat you’re using or your taste. I frequently have older adults and children at the house, so this is a pretty tame recipe as it’s written here.

One note on the pureed vegetables. When I make stock I use many veggies in it and I pull those out at the end and puree them and then pop them in containers in the freezer. They are useful for adding additional flavor to soups and as a thickening agent in gravy or meat-based pies. If you don’t do this, it’s fine to just eliminate that ingredient. I also use many vegetables that have already been roasted so the cooking time on the soup is greatly reduced when I pull this sort of recipe together. You’ll need to adjust the cooking time DOWN if you used pre-cooked vegetables like I do; or leftovers from a prior meal.

Ingredients:

  • 4-6 cups (homemade) chicken or beef broth
  • 3/4-1 cup cooked pureed onions & celery
  • 1/2-1 cup finely chopped carrot
  • 1/2-1 cup finely chopped celery
  • 1/2 cup finely chopped onion
  • 1-2 cups chopped cooked ham (or other meat)
  • 2 (15 oz) cans of black beans, rinsed or equal amount cooked (dried) beans
  • 1/2 teaspoon dry mustard
  • 1/2-1 teaspoon coriander
  • 1 teaspoon cumin
  • 1/2 teaspoon oregano
  • 1/2 teaspoon thyme
  • 1-2 cloves minced roasted garlic
  • salt & pepper to taste
  • Olive oil

Directions:

  • In a large stock pot or dutch oven, saute the carrot, celery & onion in olive oil on low/med heat for about 10 minutes until the onions are translucent. Do not brown or burn the vegetables.
  • Add in the meat (ham, chicken, sausage) along with all of the spices and cook for another 5 minutes to transfer some of the flavor. If you are using a sausage; pre-cook it on the grill or in a pan so it has some additional flavors, but don’t add it raw into the vegetables.
  • Reserve 1 cup of your stock of choice to puree some of the black beans and then add the remaining stock and pureed vegetables to the cooked vegetables and meat  in the stock pot and simmer for about 15 minutes on medium/low heat. Mash or puree half of the black beans that have been cooked and rinsed with your 1 cup of reserved broth so that they act as a thickening agent and add to your soup.
  • Add the other half of the beans to the soup whole and simmer for another 10 minutes. You can transfer this to a crock pot and leave it on low for a couple of hours.

Options:

  • If the beans and veggies get too soft you always have the option of pureeing everything which is how many black bean soups are served with a dollop of sour cream.
  • If you want to change the flavor a bit more, try adding about 1/2 cup of cooked, mashed sweet potato. The Asian purple varieties will keep the color dark and still add the same flavor as the traditional Southern orange flesh.
  • Chicken & Apple Sausage, Rabbit Sausage, Rattlesnake Sausage
Posted in Dairy-Free, General, Gluten-Free, Nut-Free, Recipes, Soup, Year-Round | Tagged , , , , , , , , , , , , , , , , , , , , , , , , , , , | Leave a comment

Mulligatawny Chicken Soup

This is one of the soups that I served at the Holiday Open House in downtown Raleigh a couple of weekends ago. In that case I served it with rice that I cooked using plain coconut water. Normally I would serve it over the rice, but I put it into the soup in order to keep it warm in the crock pot. You could do the same for a party. Heat the base soup up first in the crock pot and add the cooked rice when the soup is really good and hot and you are close to serving your guests.

Over the years I have accumulated several chicken curry recipes and there are many variations of the Mulligatawny soup floating around. I suspect this one has been toned down quite a bit to fit our culture.  All of the recipes I have used are really fast to prepare and wonderful on a cold damp day. I’m going to give you some variations at the end because I cook most of the ingredients ahead of time and store them as a part of my regular routine and the soup becomes a second harvest for us. You have to adjust the quantities if you cook this way. I think you could actually revise this a bit more for a camping trip using bullion cubes and dehydrated vegetables and chicken pieces.

Normally, I start loading up on chicken in the fall before it gets cold. Farmers don’t like to process chickens when it gets into the freezing temps. I don’t blame them one bit,  so I like to get extra in October and November, cook them up and store them in the freezer. Typically I pressure cook most of the chickens with fresh herbs, celery and onions so that I have plenty of homemade stock on hand through the winter and it’s a really fast and simple cooking method. I pull the chicken and freeze it in increments of about 2 cups. The broth is frozen in increments of 2 & 4 cups. That seems to work for most recipes. I find there is less freezer burn using hard containers instead of plastic freezer bags, but if you are tight on space, double bag the freezer bags and that will help preserve the meat better. You can also store the chicken right in the broth if you like. And I’ve done that with veggies too.

Normally I have already sautéed heirloom celery in olive oil and stored it in 1 cup increments because it comes in here during the spring. I don’ t think it dehydrates well for the leaves do very well and can be substituted in recipes with a broth or sauce. For this recipe, you can use fresh onions, dehydrated sweet onions or frozen sautéed onions; frozen roasted garlic cloves; and dehydrated apples.

The rice I typically make for this recipe is Basmati with some saffron in it. You can make it with water, coconut water, or chicken broth and I typically toast it just a tad in olive oil before I add the liquid and the top. You can leave out the saffron if you don’t have it on hand or just use a long grain white rice or another of your choice.  The soup is equally good without rice, but you’ll need to make sure to add the cornstarch  in the recipe to thicken the broth. I frequently leave it out if I’m making rice.


Mulligatawny Chicken Soup with Roasted Cauliflower


Ingredients:

  • 1 lb skinned, boned chicken mixed dark & light meat
  • 1 tablespoon olive oil
  • 1 1/2 cups chopped onions
  • 1 cup finely chopped celery
  • 1  tablespoons mild curry powder
  • 1 teaspoon medium curry powder
  • 1/2 – 1 teaspoon ground turmeric
  • 2 cloves garlic, minced (can be roasted garlic)
  • 1/2 teaspoon salt
  • 1/8 teaspoon pepper
  • About 2 cups chicken broth
  • 1 Tablespoon Cornstarch
  • 2 cups low-fat milk or coconut milk (unsweetened, low-fat)
  • 2 1/2 cups peeled, chopped apple like Golden Delicious (sweet, not tart)
  • 1/4 cup shopped fresh parsley (don’t use dried – just skip it)

You can make your own curry mix instead of using a store brand, or add a hotter curry blend.

Directions:

  • If your chicken is raw, then you need to trim the excess fat from it and chop it into bite size pieces and set aside.
  • Pour the olive oil into a deep soup pot and heat on medium. Add the chopped celery and onion and cook until almost translucent; then add the garlic and curry powder and saute for about 3 more minutes making sure not to burn the garlic.
  • Add the chicken pieces with the salt and pepper and saute for another 5 minutes.
  • Then add the chicken broth and simmer for about 10 minutes on medium heat.
  • Add the cornstarch to your milk or coconut milk and blend well with a small whisk so it doesn’t clump. Add this to your soup. You can warm the (coconut) milk in the microwave for about a minute on 60% to make sure you don’t lower the temperature of the soup when you add it, but it’s not a vital step in the process. Once you’ve added the milk continue to stir constantly to blend with the broth and bring it up to a simmer point for 5-10 minutes until it is thickened. Add the apple  and cook 5 more minutes. You are not trying to cook the apple, just soften it a bit.
  • A couple of quick notes on using pre-cooked frozen items. If you are using caramelized onions that you have already frozen, cut back on the amount to about half when measuring. Onions release a lot of water in the cooking process and you won’t need as many. If you are using dehydrated onions, then you will need to cut back the amount to about 1/4 of the original and you need to add those when you add the broth so they can reconstitute in the liquid.
  • If you are using dehydrated apple slices like I do, make sure you break them up into small bite size pieces and add them with the milk so they can come back to life as the broth is finishing.

Fall 2011 Update

  • This soup is also wonderful with cauliflower that is roasted with different curries. Try adding between 1-2 cups depending on how much you like cauliflower.
  • Dehydrated celery leaves work to enhance the flavor if you’re out of celery stalks. Use about 1/4 cup crushed. They have a lot more flavor than the stalks so add sparingly.
  • Dehydrated onions can be used in this recipe after hydrating them in water.
Posted in Fall, General, Summer | Tagged , , , , , , , , , , , , , , , , , , , , , , | Leave a comment